
I have looked into service manuals from brands like Toyota, Honda, and even some European ones, plus guides from reliable sources like Haynes and Consumer Reports, and after working on cars in Lagos and Abuja for years, I know serpentine belts are a big deal here. That long rubber belt under your bonnet drives critical parts like the alternator, AC compressor, power steering pump, and water pump. In Nigeria, with our hot climate, dusty roads, and stop-go traffic, these belts wear out faster than in cooler places. A failing belt can leave you stranded with no charging, no cooling, or hard steering. Regular checks and timely replacement keep your car reliable and save you from expensive breakdowns. Let us go through inspection and replacement step by step, based on what actually works in our conditions.
First, understand why inspection matters more here. Harmattan dust grinds into the belt grooves, heat from 35 to 40 degree days makes rubber crack quicker, and potholes add extra stress on the tensioner. Most manuals suggest checking every oil change, which is every 5000 to 10000 kilometers in city driving, or at least twice a year before rainy and dry seasons. From what I have seen, Nigerian drivers should inspect every 10000 kilometers or six months, whichever comes first. Early detection means you replace before it snaps on the expressway.
How to inspect your serpentine belt properly. Park on flat ground with the engine off and cold. Pop the bonnet and locate the belt, usually looping around pulleys on the front or side of the engine. You might need a flashlight in dim garages. Look for cracks, which show as small lines across the ribs, often from heat aging. Glazing appears as a shiny, smooth surface where the belt should be rough for grip, caused by slipping on pulleys. Fraying or splitting edges mean the sides are wearing from misalignment. Missing chunks in the grooves indicate advanced damage, possibly from debris. Twist the belt gently to check the underside for separating layers or deep cracks. Listen for squealing when the engine runs, especially with AC on, as that signals slippage. Feel the tension by pressing midway between pulleys, it should give about one centimeter without much effort. If it feels loose or too tight, the automatic tensioner might be failing. While you are there, spin the idler pulleys by hand, they should turn smoothly without wobble or grinding noise. A bad pulley can chew up a new belt fast.
If your inspection shows minor wear like light glazing, you might clean it with a rag and brake cleaner, but that is temporary. Serious issues mean replacement time. Schedules vary by car, Toyota recommends every 100000 kilometers for models like Corolla, Honda around 80000 to 100000 for Civic, but in Nigeria, aim for 60000 to 80000 kilometers or when wear appears. Belts last three to five years typically, but our conditions shorten that to two to four. Always check your owner manual for exact intervals, and if you tow loads or drive dusty village roads, shorten it further.
Now, replacement. You can do this DIY in 30 to 60 minutes with basic tools, saving 15000 to 30000 naira that mechanics charge. Gather a new belt matching your car’s specs, buy genuine from parts shops like Ladipo or online, costs 15000 to 35000 naira depending on the model. You need a ratchet wrench, sockets to fit your tensioner bolt usually 14 or 15 millimeters, and maybe a breaker bar for leverage. A belt routing diagram from the manual or under the bonnet helps too.
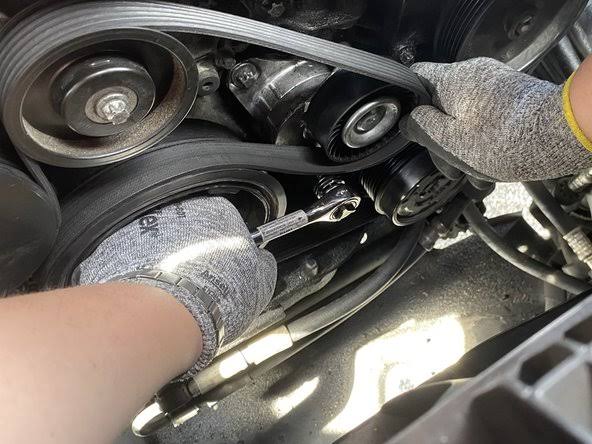
Start with the engine off and cold. Disconnect the negative battery cable for safety if your car has sensitive electronics. Locate the tensioner, a spring-loaded pulley that keeps the belt tight. Use your ratchet to turn the tensioner bolt clockwise or counterclockwise, check the arrow on it, to release tension. Slip the old belt off the pulleys, starting from the alternator or the easiest access point. Note the routing as you remove it, or snap a photo.
Inspect all pulleys for damage, clean any grime with a rag, and replace any worn idler or tensioner now, they cost 20000 to 50000 naira but prevent repeat work.Install the new belt by following the routing diagram exactly. Start at the crankshaft pulley at the bottom, then work around each accessory, saving the tensioner for last. Release the tensioner again, slip the belt over it, and slowly let go. Double check that the belt sits flat in every groove, no twists. Reconnect the battery, start the engine, and watch the belt run for a minute. It should track straight without noise. If it squeals, recheck alignment or tension.
Some pro tips from my experience and the guides I studied. Always replace the tensioner and idlers with the belt if your car has over 100000 kilometers, as they wear together. Use a belt dressing spray sparingly if needed for initial grip, but not as a fix for problems. In rainy season, water can make belts slip more, so inspect after heavy drives. For cars with multiple belts like older models, the process is similar but do one at a time. Common mistakes include wrong routing, which overloads accessories, or over tightening the tensioner bolt, stripping threads. If your car uses a manual tensioner, adjust to the spec in the manual, usually marked on the arm.
After replacement, your car should charge better, AC cool stronger, and steering feel lighter. Fuel economy improves slightly too, as the engine works less hard. I have seen engines last longer with this simple upkeep. In Nigeria, where parts are pricey and mechanics vary in skill, learning this empowers you. If you are not confident, watch a model specific video first or take it to a trusted shop. Either way, do not ignore that squeal or crack, your drive home depends on it.