
A parking brake that slips or drags can make parking on a hill feel risky, or it might cause uneven wear on your rear brakes if it pulls too hard. Adjusting it yourself is one of those jobs that looks intimidating but is actually straightforward once you know the layout. Most cars still use a mechanical cable system connected to a lever or pedal, and the adjustment point is usually simple to reach. From checking service manuals for popular models like Toyota Corolla, Honda Civic, and various pickups, plus real-world fixes shared by mechanics and owners, the process is consistent across many vehicles. You do not need special tools beyond a jack, stands, and basic wrenches. Here is how to do it safely and correctly.
Why the Parking Brake Needs Adjustment
The parking brake (also called handbrake or emergency brake) works independently of your foot brakes. Over time, the cables stretch slightly, the shoes or pads wear down, or the adjuster mechanism settles, so the lever travels too far before the brake engages. If it only holds after pulling several clicks, or if the car rolls slightly on a slope, it needs tightening. On the other hand, if the rear wheels drag even when released, it is too tight and can overheat the brakes or reduce fuel economy. Proper adjustment ensures the brake holds the car firmly on a moderate incline (about 20–30 degrees) with the lever pulled 3–6 clicks (or pedal travel halfway on pedal types). Manuals generally recommend checking this every 20,000–30,000 kilometers or during brake service.
Safety First: Preparation Steps
Park on a flat, level surface with the transmission in park (or first gear for manuals) and the foot brake fully applied. Chock the front wheels with bricks or wheel chocks to prevent rolling. Release the parking brake completely. Jack up the rear of the car and support it securely on jack stands—never work under a car held only by a jack. Remove both rear wheels so you can access the brake drums or calipers easily and spin the wheels freely to feel drag. This setup takes 5–10 minutes but makes the job accurate and safe.
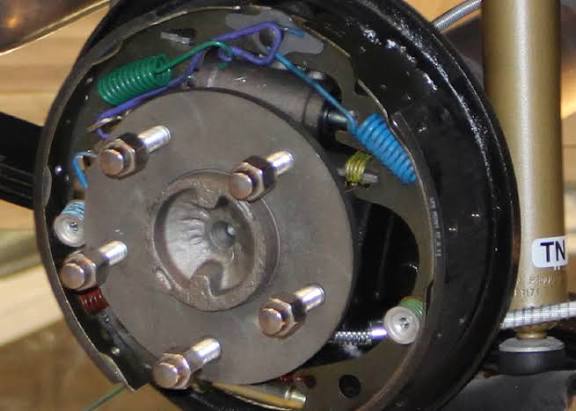
Locate the Adjustment Point
Most mechanical parking brakes have two common adjustment locations. The easiest is at the handbrake lever itself, inside the cabin. Look under the center console or pull back the rubber boot around the lever base—there is usually a nut or threaded rod with a locknut. Tightening this nut shortens the cable overall, pulling the rear brakes tighter. On many Toyotas and Hondas, this is the primary spot. The second (and sometimes only) adjustment is at the rear wheels. For drum brakes, remove the rubber plug on the backing plate to access an adjuster star wheel. For disc brakes with integrated drum parking brakes (common on newer models), the adjuster is often inside the hub or accessed through a slot. Check your owner’s manual or a quick online search for “parking brake adjustment [your car model year]” to confirm the exact spot. Never force anything—if it does not move easily, stop and verify the location.
Adjusting the Parking Brake Step by Step
Start with the lever adjustment if your car has one. Loosen the locknut, then turn the adjusting nut clockwise (usually) to take up slack. Pull the lever up and count the clicks—aim for 4 to 7 clicks before firm resistance. Tighten the locknut while holding the adjuster. Test by pulling the lever fully; the rear wheels should lock solidly when applied and spin freely when released. If the lever still feels too loose or too tight, move to the rear adjusters.
For drum brakes, turn the star wheel adjuster with a flat screwdriver through the access hole. Turn it until you feel slight drag on the wheel when spinning by hand, then back off 3–5 notches so it spins freely with a faint scrape. Do both sides equally. For disc-with-drum parking brakes, the adjuster is often a nut on the caliper or inside the hub—turn it until light drag, then back off slightly. Spin each wheel by hand after each adjustment to ensure even feel. Reinstall wheels, lower the car, and test on a gentle slope: the car should hold steady with the lever pulled 4–6 clicks. If it rolls, tighten a little more. If the wheels drag when released, loosen slightly.
Testing and Fine-Tuning
After adjustment, drive slowly and test braking feel. The parking brake should hold without excessive lever travel, and the rear wheels should not drag when driving forward. If the pedal or lever still feels spongy, check cable stretch or worn shoes/pads—adjustment alone cannot compensate for major wear. Recheck after 100 kilometers, as new adjustments can settle.
Common Mistakes and When to Stop
Do not overtighten the brake should release fully, or you will get hot brakes and poor mileage. Never adjust with the car on the ground without loosening lugs first, as it can bind. If the cable is rusted solid or the adjuster will not turn, stop and inspect for damage; a seized cable needs replacement (₦10,000–₦25,000). Electric parking brakes on newer cars are not DIY adjustable those require dealer tools. If unsure, a quick shop check costs little and prevents safety issues.
Adjusting your parking brake is straightforward maintenance that improves safety and prevents uneven brake wear. Do it every year or during brake service, and you will have confidence on any hill. A few minutes of work keeps your car reliable and your wallet happy.