
Bleeding your brakes solo might seem intimidating if you’re used to having a helper pump the pedal while you handle the bleeder screws, but it’s entirely feasible with some simple tools and patience. This process removes air bubbles from the brake lines, which can cause a spongy pedal or reduced stopping power after tasks like changing pads, rotors, or fluid. Done right, it restores firm braking and enhances safety. From reviewing guides on sites like Haynes Manuals and mechanic forums, plus YouTube tutorials from experienced DIYers, the key is using a method that prevents air from re-entering the system, like a one-way valve or vacuum pump. Always prioritize safety: work on a level surface, use jack stands, and wear gloves and eye protection. This guide focuses on the pump-and-hold method with a DIY setup, suitable for most cars, but check your owner’s manual for specifics like fluid type (usually DOT 3 or 4) or bleeding order.
Gather Your Tools and Materials First
Before diving in, round up everything to avoid mid-job trips. You’ll need fresh brake fluid (about a quart, matching your vehicle’s spec, never mix types), a clear plastic hose (1/4-inch inner diameter, 2-3 feet long), a wrench that fits your bleeder screws (often 8-10mm), an empty bottle or jar for old fluid, rags, and a turkey baster or syringe to remove old fluid from the reservoir. For solo work, a one-way check valve (cheap online, around $5-10) or a vacuum bleeder kit (like Mityvac, $30-50) makes life easier by acting as your “helper.” If budget’s tight, make a DIY setup: Drill a small hole in the bottle lid, insert the hose tightly, and fill the bottle a quarter full of fluid to submerge the hose end, this creates a seal against air suck-back. Jack, jack stands, and wheel chocks are essential for lifting the car safely. Expect the job to take 1-2 hours for all four wheels.
Prepare the Vehicle and Master Cylinder
Park on flat ground, chock the wheels opposite the ones you’ll jack, and loosen the lug nuts slightly before lifting. Jack up one corner at a time or the whole car if you have multiple stands, never work under just a jack. Remove the wheels for easier access to the bleeder screws, located on the back of each caliper or drum. Open the hood and locate the brake master cylinder reservoir, usually near the firewall on the driver’s side. Use the baster to suck out as much old fluid as possible without emptying it completely old fluid is often dark and contaminated, while new is clear. Refill with fresh fluid to the max line. This step prevents pushing gunk through the lines. Keep the cap off during bleeding but cover with a rag to avoid spills. If your car has ABS, consult the manual; some require cycling the key or using a scan tool to avoid damaging the module.
Determine the Bleeding Order
The sequence matters to push air out efficiently, starting farthest from the master cylinder and working closer. For most vehicles, it’s passenger rear, driver rear, passenger front, then driver front. This follows the line lengths: rears are longer, so air travels farther. Confirm in your manual, some imports like Subarus might reverse it, or trucks with rear drums could differ. Bleeding out of order risks trapping bubbles. If you’re flushing fluid too, this order ensures complete replacement. Pros note that skipping this can leave air pockets, leading to persistent sponginess.
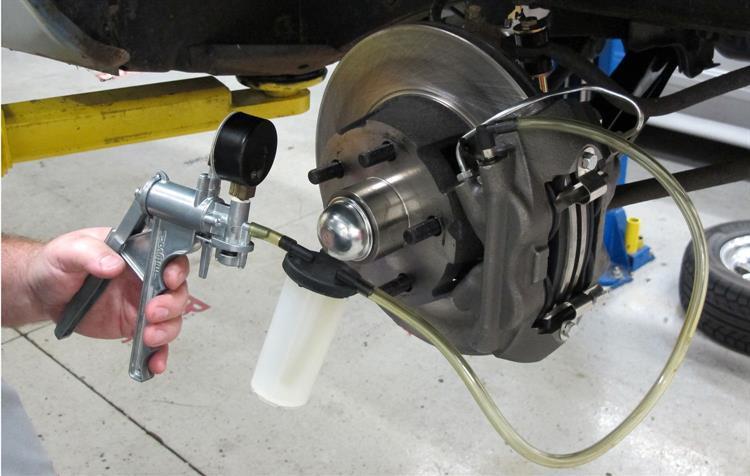
Bleed the First Wheel: The Pump-and-Hold Method
Start at the farthest wheel. Slip the hose over the bleeder screw nipple, ensure a snug fit to avoid leaks. Submerge the other end in the bottle with some fluid; this traps outgoing bubbles and prevents air draw-back. Crack the screw open about a quarter turn with the wrench (counterclockwise), but don’t remove it fully. Hop in the car, pump the brake pedal 4-5 times slowly and firmly to build pressure, then hold it down steadily. Fluid (and hopefully air bubbles) will flow through the hose into the bottle. While holding the pedal down, tighten the screw to close it, this is crucial to avoid sucking air back in when the pedal releases. Release the pedal, check the reservoir level (top off if below halfway), and repeat the cycle 10-15 times or until the fluid runs clear without bubbles. The pedal might feel softer at first as air exits, but it should firm up. If using a check valve, it automates the hold, letting you pump without rushing back to close the screw.
Repeat for Remaining Wheels and Monitor Fluid
Move to the next wheel in sequence, repeating the process. Each should take fewer cycles as air is pushed out progressively. Keep an eye on the master cylinder, never let it run dry, or you’ll introduce more air, starting over. Top off after every 5-10 pumps. If fluid looks milky or foamy in the hose, that’s air; continue until it’s solid and clear. For rear drums, the process is similar, but access might require removing the drum. If your setup uses a vacuum pump, attach it to the bleeder, open the screw, and draw fluid out steadily, it’s hands-free and great for solo, pulling 15-20 inches of mercury to extract bubbles. Whichever method, dispose of old fluid properly; it’s hazardous waste.
Alternative Solo Methods: Gravity or Pressure Bleeding
If pumping wears you out, try gravity bleeding: Open the bleeder, attach the hose to the bottle, and let fluid drip out slowly while keeping the reservoir topped. It takes longer (30-60 minutes per wheel) but requires no pedal work, ideal for patience. Monitor for drips to stop, indicating air is gone. For faster results, a pressure bleeder attaches to the reservoir, pressurizing the system to force fluid through open bleeders. These kits ($50-100) are reusable and minimize mess, but ensure the adapter fits your cap. Mechanics favor this for thorough flushes, as it pushes contaminants out better than pumping.
Final Checks and Test Drive
After all wheels, refill the reservoir to the max line, secure the cap, and pump the pedal 20-30 times with the engine off to build pressure, it should feel firm without sinking. Wipe any spills, as brake fluid eats paint. Reinstall wheels, torque lugs to spec (usually 80-100 ft-lbs), and lower the car. Start the engine; the pedal might drop slightly as the booster engages, but it should hold. Test in a safe area: Drive slowly, brake gently, then progressively harder. If spongy, re-bleed the affected wheel. For ABS cars, a road test activates the module to purge any trapped air. If issues persist, it might be a leak or bad master cylinder, seek a pro.
Common Mistakes and Safety Tips
Avoid over-tightening bleeders, they can strip or snap. If a screw is stuck, apply penetrating oil and tap gently. Don’t bleed with the engine running unless specified, as it can spray fluid. Work clean: Dirt in the system causes clogs. If you’re new, practice on one wheel first. This job’s not for every car, hybrids or those with electronic brakes might need dealer tools. Costs: DIY under $20 for basics, vs. $100-200 at a shop. Done every 2-3 years or after brake work, it keeps your system reliable. If unsure, watch videos for your model. Bleeding solo empowers you to maintain your ride safely, take your time, and you’ll nail it.