
Dash cams are becoming a must-have for drivers everywhere, and in Nigeria, they are especially useful. With unpredictable traffic, potholes that cause accidents, and the need for proof in disputes, a dash cam records what happens on the road. It can save you from false claims or help with insurance. Installing one yourself is straightforward if you follow the right steps no need for a mechanic unless you want professional wiring. Most dash cams plug into the cigarette lighter and mount on the windshield, but hardwiring for constant power takes a bit more work.
The process takes 30 minutes to an hour, depending on the model. Let us go through it clearly, so you can do it confidently and get that extra peace of mind.
Choose the Right Dash Cam First
Before installation, pick a dash cam that fits your needs. Basic ones like the Garmin Dash Cam Mini 2 (around ₦20,000) record in HD and are small enough to hide behind the mirror. For front and rear coverage, go for the Nextbase 422GW (₦40,000–₦60,000), which includes night vision and GPS for speed tracking. Look for loop recording (overwrites old footage) and G-sensor (locks videos during impacts).
In our hot weather, get one with heat-resistant capacitors instead of batteries to avoid overheating issues. Read reviews from Nigerian users on sites like Jumia or Nairaland they mention how well models hold up to sun and dust.
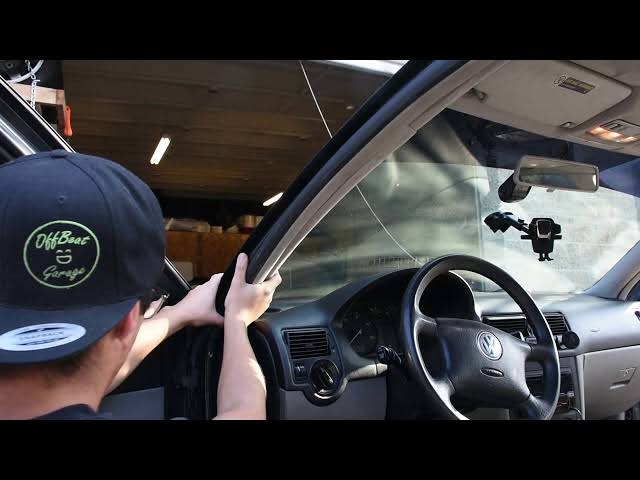
Gather Your Tools and Prepare the Car
You need a few basics: the dash cam kit (includes mount, power cable, and clips), a trim removal tool or plastic pry bar (to hide wires without scratching), zip ties or adhesive clips for cable management, and a fuse tap if hardwiring.
A flashlight helps for dark spots under the dash. Park in shade on a flat surface with the engine off. Clean the windshield inside where the cam will mount use alcohol wipes for a strong bond. Decide if you want plug-in power (easy) or hardwired (hides cables and enables parking mode).
Mount the Dash Cam Securely
The mount is usually a sticker or suction cup. For sticker mounts (more stable), peel the backing and press it firmly to the windshield behind the rearview mirror high enough not to block your view but low enough to hide from outside. Suction cups work too but loosen in heat, so sticker is better here.
Attach the cam to the mount it clicks or slides in. Angle it slightly down to capture the road ahead, including the hood for reference. Test the view by sitting in the driver’s seat make sure it covers lanes without glare from the dash.
Route the Power Cable Neatly
For plug-in setup, run the cable from the cam along the headliner (tuck it under the edge with your fingers or pry tool), down the A-pillar (behind the trim), and to the cigarette lighter. Use clips to secure it so it does not dangle.
Avoid airbags do not force wire behind pillar trim if it blocks deployment. Plug in and test: the cam should power on with the ignition. For hardwiring (for parking mode), connect to a fuse box under the dash. Use a fuse tap on an accessory fuse (turns on with ignition) for the positive wire, ground the black wire to a metal bolt. This lets the cam record when parked if motion detected. If unsure, watch a model-specific video hardwiring takes 20–30 minutes but hides everything